

I noticed a few days there were at least a couple of you planning on building racks around CB110 tubs. Well, since I already did it, I sat down and wrote up some plans and instructions. Of course by no means the only way to do it, only how I did it:
For anyone interested. I built two racks for Iris CB110 tubs.
Both racks Will have belly heat and will be built using cabinet maker methods.
Each rack has 10 slots or 11 shelves.
I have a spreadsheet I made to figure out my cut list and I decided to make the racks full height to get as many tubs in one vertical space as I could. Warning, these suckers are heavy, Weight estimate for melamine and wheels per rack is 324 lbs, actual weight probably closer to 340lbs, not light weight racks by any means.
Parts list for one rack:
5 sheets of 3/4" melamine
One sheet of 1/4 hardboard (one sheet will be enough for two backs)
4 heavy duty low height wheels (side and back height based on 3" wheels, may need to adjust)
16 sets Hardware (carriage bolt/washer/nut) to attach wheels
10 sets flexwatt - 11" panel of flexwatt, lamp cord and plug
Reflectix for back 20 1/4" x 73"
1 50' roll of edge banding
Cut list:
2 sides - 40 1/2" x 73" x 3/4" melamine
11 shelves - 20 1/4" x 40" x 3/4" melamine
1 toe kick - ~ 4" x 201/4" x 3/4" melamine (exact height determined AFTER assembly)
1 back - 20 1/4" x 73" x 1/4" hardboard
2 cleats for bottom - 4" x 39" x 3/4" melamine
2 parts for roller base ~4" x ~ 36" x 3/4"melamine (exact dims based on wheels and toekick placement)
2 parts for roller base ~4" x 20 1/8" x 3/4" melamine (exact dims based on wheels and toekick placement)
Cutting the melamine should be done in the following sequence to maximize usage:
Really need a full size table saw or buy precut from a cabinet shop, How I made my cuts was,
The first cut on two sheets will be cutting sides to length. Unless you're good with a table saw AND have a really good cabinet saw, I recommend using a straight edge and a good circular saw. Set the edge so the cut will leave the main piece at 73" long. The two scraps can be used for shelves. Set aside the larger pieces for later.
While you're at it, cut the back to the same 73" length and set aside with the side pieces
1st saw setting, cut the remaining three sheets into unequal halves, with one piece at 41" or, 97" x 49" (melamine comes 1" oversized) was cut into 1 piece 41" x 49" and one piece 56 7/8" x 49". This makes the full sheets smaller and easier to handle.
2nd saw setting, 40 inches, cut one of the two scraps from the side pieces and FIVE of the larger half sheet pieces (3 of the 41" and two of the 56" ones) into 40" on one dimension. The half sheet pieces can actually be cut either way. The remaining half sheet is a scrap for another project..
3rd saw setting, I like to clean up edges so I set to about 23" (enough to trim some off) for the one scrap piece. Cut off the edge that was cut with the circular saw, not always the cleanest cut.
4th saw setting, 20 1/4", cut the scrap piece and all five of the other pieces into 40" x 20 1/4" pieces (each of the larger pieces will yield two shelves). PAY attention to the 5 larger pieces as to which dimension is already cut to 40". For the scrap (from the sides) cut off the side that was NOT cut in the 23" setting.
5th saw setting, 20 3/16", just shy of the prior setting, cut the back piece.
6th saw setting, 40 1/2", make the remaining cut on the two side pieces.
Also cut two pieces 4" x 39" from a scrap for the bottom cleats.
You should now have 11 shelves, 2 sides and one back. The other miscellaneous pieces will be cut as you need them.
I recessed my flexwatt by routing out areas for it. Hindsight being 20/20, may not have been necessary. The CB110 tub has feet. I believe the heat tape could be placed between them and the tub slide over it.
Edge banding - All exposed edges will need this treatment for a durable edge and professional edge. You will need the following:
Edge banding
Iron (don't use the wife's, get you own cheapo one)
Roller - heavy rubber roller for pressing edge banding into place for stronger bond.
Trimmer - special block/knife to trim banding flush
Some instructions say to cut oversize, I just leave on roll and cut off later. Start with banding extending a half inch beyond edge being banded and the roll hanging off the other end. Must be straight, not cockeyed. Start with the iron on cotton setting and iron on slowly. Long edges may require working in sections. Heat until glue melts and entire length is hot. Quickly remove iron and pressure roll banding onto edge. Cut and trim banding. I also sand edge to remove any glue. Sandpaper clogs up fast so you'll use many pieces.
You will need to edge band:
All front edges of the 11 shelves
Both front and top edges of the floor cleats
Both front edges of the sides
Optionally band the top and bottom edges of the sides for strength against chipping.
Assembly spacing jig - you will need to carefully measure the exact height of the tub. Place tub on shelf, put a second shelf on top of tub and measure distance between. I added 3/16" and cut two full pieces to that width, the pieces should be at least 40 1/2" better if a few inches longer.
TEST SPACING JIGS FIRST, place shelf on flat surface (table saw?) Using the two spacers, elevate a second shelf from the first. Add another shelf or two for weight. Test tub spacing by sliding into cavity. Should go in smooth and have a small gap at top. You determine how much gap is good for you
Assembly is done upside down and much easier with help.
Use one of the scrap pieces of melamine to create a nice flat area to work on.
Place one shelf flat on the scrap and two sides vertically with edge banded sides all facing the same way. I did a lot to keep it square for the first shelf. I placed shelves vertically at front and back and also clamped one more shelf at the top to keep the sides as square as possible. Once you are certain everything is square, attach sides to shelf. I used a brad nailer and pocket hole/screws, you could use screws or nails.
Next shelf (and all subsequent shelves) are located by placing spacers next to the sides and place the shelf on top of them. I used LOTS of clamps to hold everything in place while I made final attachment.
After last shelf installed (bottom shelf), install bottom cleats with SEVERAL screws. Flush to what will be the top side of the bottom shelf and also flush to the rear of the shelf. These cleats will transfer the weight from the sides to the bottom shelf. Without them the bottom shelf will most likely fail and collapse under the weight of the rack.
Now measure the remaining distance for the toe kick. Cut piece to fit and install a three inches back from front.
Roller base - now measure and make a roller base to fit in the base area behind the toe kick. Make sure the wheels have room to turn and I recessed the carriage bolt heads so it would sit flush. I also had to cut off the end of the carriage bolts to make them the correct length.
Attach the roller base to the rack with screws.
Turn the rack right side up, IMPORTANT, only tip from to back since there is no back in place. DO NOT tip side to side, not stable in this direction!
Install flexwatt panels on the shelves, route and restrain wires to one side.
Tip rack back onto front and partially install back, only the side where the wires will come out. Mark locations for notches for the wires AND thermostat probe. Remove back and cut notches. Mark the sides for the center of each shelf. Cut reflectix to fit, install back and reflectix, screw in place, I used 3 screws per shelf.
Stand rack back up and move it to your final location.
Some pics:
Kinda hard to see but there is a jig (also made of Melamine) on a shelf which defines the recessed area for the heat tape.

After cutting the recess outline and removing the jig

finished hogging out the middle area of the recess

This is a different rack but shows a similar assembly process.
This smaller rack has the top and one shelf installed.
Note the spacers to hold the shelves apart and lots of clamps to hold everything together while assembling.

Same other rack with more shelves installed.

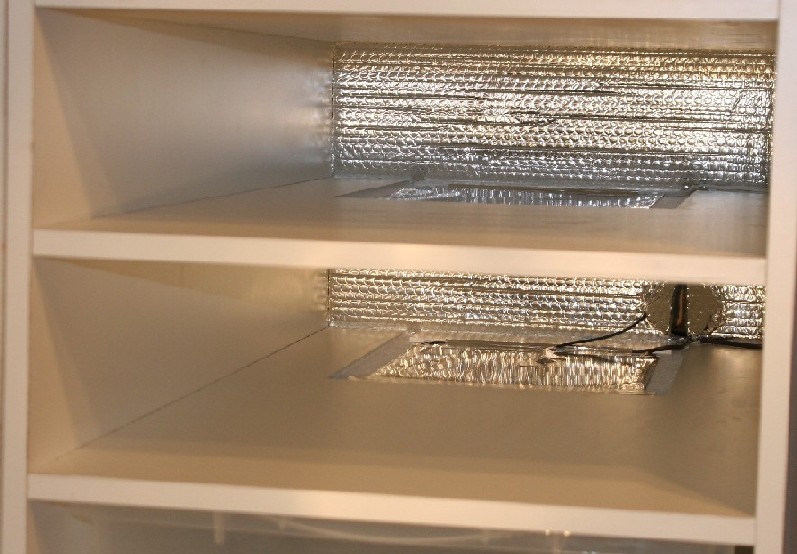
Installing the flexwatt panels

A close-up of the flexwatt panels.
Note: I changed the design after this pic to have the cords come out the back.

From the back, you can see the cleats supporting the sides from the bottom shelf and the roller base

Laid back down, installing the backs and reflectix

One from the front showing the completed look of the cleats and how the tubs slide over them.

Both racks side by side in their final position in my snake room

a close up of the thermostat probe coming through the back. All cords were numbered and the level with the probe has a different color cord so it won't mistakenly get unplugged.
-----
Thanks,
Dave Colling

www.rainbows-r-us-reptiles.com
0.1 Wife (WC)
0.2 kids (CBB, a big part of our selective breeding program)
LOL, to many snakes to list, last count:
13.24 BRB
12.14 BCI
And those are only the breeders 
lots.lots.lots feeder mice and rats 
