Reptile & Amphibian Forums

Welcome to kingsnake.com's message board system. Here you may share and discuss information with others about your favorite reptile and amphibian related topics such as care and feeding, caging requirements, permits and licenses, and more. Launched in 1997, the kingsnake.com message board system is one of the oldest and largest systems on the internet.

https://www.crepnw.com/

Cheap DIY rolling glass track

Upscale Jan 15, 2010 12:40 AM

This is one of my real innovations that I have never seen before. I was doing a cage with a big front door and I wanted to do rolling glass, but the track was very expensive. So I decided to make my own, of course.

I posted this about a year ago, but it’s good to follow up and let you know that it is working great a year later, and you should keep it in the back of your mind for an idea you might use someday.

I used a regular plastic track that would normally be used for a very light weight sliding (not rolling) door, these come in a shallow lower track and a deeper upper. I was able to buy just the deeper upper tracks at a cabinet builders supply place.

I got the idea to use these copper stop sleeves for rollers because a bag of 100 was only $9.95. The plastic tracks are $11.00 for six feet.
Here’s a sketch of the basic idea.

Here’s a sample of how I put these together.

I used a template to make holes in the track exactly the same depth so all the rollers are the same depth, every two inches. By using the deeper upper track for the bottom, I had room to mount the rollers and still have enough lip for the glass to be in the track.

I did drill the track under each roller to shave off the hump.
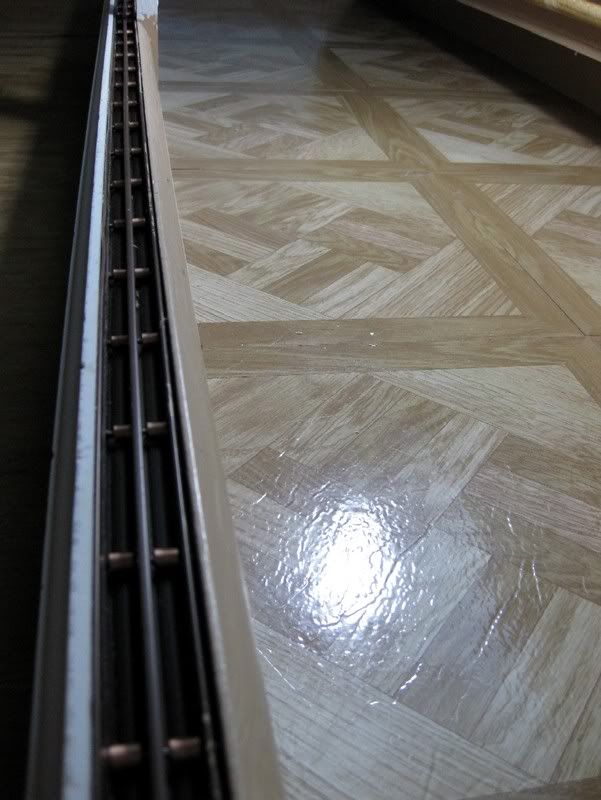
Here’s the finished track installed. The glass just sets into the tracks as usual, but they glide over the copper rollers very easily.

This is the finished cage with the glass installed. So far I haven’t had any trouble keeping Aspen chips out, etc. It works as good as any other track as far as I know. These are pretty good sized heavy safety glass doors too.

It was worth posting this follow up, as the subject of doors, tracks and all that comes up every now and again.

Thanks for looking!

Replies (11)

Bighurt Jan 15, 2010 05:56 AM

Awesome idea!

Did you use two tops, probably looks better with the top track on both top and bottom then just on top...also minimizes what you have to buy, x feet of one rather then y feet of two...

Good Job.
-----
Jeremy Payne
JB Reptile

1.0 Snow "Kahl"
0.2 Triple Het Moonglow "Kahl"
0.1 Orange Tail Hypo Het Leopard
0.1 Double Het "Sharp" Snow
1.0 Ghost
0.1 DH Ghost
1.1 "Kahl" Albino
1.0.2 Hypomelenistic
1.3 Pastel Hypo
0.1 Anerthrystic
0.0.2 Normal

1.1 Morelia Clastolepis

Upscale Jan 15, 2010 08:42 AM

Yes I used top tracks for top and bottom. You have to have the deeper on top always so you have that little bit of room to lift the glass into and drop into the bottom track. That’s what makes the doors removable. They are also available in white, I think. The upper was deep enough to mount the rollers and have like the regular bottom depth for the glass to ride in.

For this cage, I actually got four because the cage is seven feet wide. I just put the seam in the center, where there is always some part of the glass overlapping. It was really very simple.
My template was just a small piece of the track drilled twice. I would drill the hole and slide it down to the next hole and stick a nail in it and then drill the next hole and keep doing that all the way down. It literally took about ten minutes once I got going.

The critical thing with building a cage with the rolling track or sliding glass track, is that the cage be very true and square, at least in the front.
I put together this little diagram to illustrate how I do the fronts. The 3/4 inch wide track sits on a nice straight board that is also ¾ inch wide. The blue frame behind is good hard oak and is the thing that keeps everything good. I use a nail gun and glue and make it very solid around the door so it doesn’t warp or sag. The white trim on the front is just some baseboard type molding. I do drill tiny little holes for the heads of the roller nails to sit in, and the trim on the back side, which is not actually shown in the diagram, gets the sharp ends of the nails. I just squeeze with a clamp to drive the tips in so they are seated into the trim pieces.

Here’s another drawing with the roller detail, showing the way it is sandwiched with the trim boards on both sides of the track.

The rest of the cage is quite simply a wooden box, construct as elaborate or simple as you like.

Just make them secure so your “pets” don’t get out!

jgragg Jan 15, 2010 10:50 AM

Thanks a lot for this contribution. I remember your post - I save everyone's posts that look super-relevant to what I'm into, as Word docs. I opened my file just now and saw your original post was 1/15/2009.

The first question I had last year was "what'd you do about the ends of the nails?" (I never asked, I just thought I'd figure something out when I used your idea.) So...thanks a lot for the diagram with the oak backer and the trim! I copy/pasted the diagrams & text onto the end of my original doc.

Anyway, I have a dream of building a huge naturalistic tropical vivarium or paludarium. I'm a fan of the bypass sliding doors, and I know I'll need rollers for the dimensions I'm considering (each door maybe 4' tall and 3' wide). I've made a few smaller ones and haven't needed the rollers, but I want to "upscale", ha ha.

Cheers,
Jimi

Bighurt Jan 15, 2010 01:49 PM

I can't view pictures at work so I'll respond to that later.

However I get my track in 12' lengths and incidently I have more top than Bottom. So I may try a similar method, where did you get the rollers?

As for front frames all my WIP cages have face frames, they are true by the nature of their construction.

Also the track comes in White Black and Colored depending on Vendor, the brown looks ok with Oak but it would it could look better. I'm going to attempt to hide my black track a bit better on my new builds, as the fronts will probably be Birch. Either that of match and paint the track with some Krylon.

Cheers
-----
Jeremy Payne
JB Reptile

1.0 Snow "Kahl"
0.2 Triple Het Moonglow "Kahl"
0.1 Orange Tail Hypo Het Leopard
0.1 Double Het "Sharp" Snow
1.0 Ghost
0.1 DH Ghost
1.1 "Kahl" Albino
1.0.2 Hypomelenistic
1.3 Pastel Hypo
0.1 Anerthrystic
0.0.2 Normal

1.1 Morelia Clastolepis

saagbay Jan 15, 2010 10:42 AM

i like that idea nice job!

just a couple Qs

how do you keep those nails in place? i saw the detail drawings in you other post do the nails get cut to length and held in place just by being sandwiched between the moldings??

also i see that the brass fittings fit pretty lose in the track do you have any problem with the glass getting wedged in that gap?
-----
-Stephen-

0.1 Fiance (Babe)
1.0 rotwiler/chow (Boomer)
1.0 norm corn (Jake)
1.0 col redtail boa (Switch, formally known as Dixie)
0.1 ball python (Bella)
1.1 Brazilian Rainbow Boa (Torpaz & Saphira)

Upscale Jan 15, 2010 12:58 PM

I dont cut the nails. They are imbedded into the trim on both sides like you can see illustrated in that one drawing. On the dull head side, I drill a very small hole. To be perfectly accurate, I use a small center punch and tap a little ding everywhere the nail head will be. It is very easy to put the trim board up against before it is installed and tap the sharp side of the nail to mark where to make the indents for the heads. Then the sharp side, I just put the trim there and squeeze it into the nail ends. So the nails are supported by the holes in the plastic track and the little bit that is in the wood when it is all put together.

The glass is thicker than the stop sleeve. It is almost tight to the width of the plastic track, ¼ inch. The very small extra space gives the stop sleeve plenty of room to move freely.

The clamp I use (and I use them for everything) are the type that you squeeze the handle and it gets tighter and tighter, so they are perfect for skrunching the trim board right into the nails. I do also glue and nail gun the trim in place so it gets real solid.

I could always take some more pictures of things if need be, but it is really very simple. And pretty cheap compared to the proper roller assemblies. I was going to have to get eight foot ones and cut them, which would have been a lot more expensive and complicated. Even with the proper track, usually you use two rollers on the glass, one near each end. So the glass is really riding on those two points. With this, the glass is riding on these rollers spaced every two inches, which seems to me to be better.

I only posted this again because I have used it long enough now to be able to say I think it works pretty good.

saagbay Jan 15, 2010 04:54 PM

no dont get me wrong im not trying to pick it apart to disprove it or anything... quite the opposite i actually am very impressed... those two things kinda jumped out at me as potential problems or not even that maybe just something that could possibly be improved. but you had this system in use now and prove that its sound...

like i said i am very impressed, and i will for sure try to use the idea myself if i ever get the chance

one other thing is that the rollers sit up above the bottom of the track, so if you do happen to get some substrate in there, it will fall down below not affecting the rollers at all
-----
-Stephen-

0.1 Fiance (Babe)
1.0 rotwiler/chow (Boomer)
1.0 norm corn (Jake)
1.0 col redtail boa (Switch, formally known as Dixie)
0.1 ball python (Bella)
1.1 Brazilian Rainbow Boa (Torpaz & Saphira)

Upscale Jan 15, 2010 05:28 PM

I am really happy to contribute in this forum, I was gladly answering your questions. If I could improve this, it might be to find some sort of roller that had a rubber coating or more like a little wheel instead of metal against glass. I actually looked for all types or bearings, toy car and train wheels, beads, cutting tubing and putting on the copper sleeves, I tried a bunch of things before going with this simple idea. I have a couple of mock ups I did and was sliding sheets of plexi in to really know what I was getting into before investing in the whole cage. One key to me was getting the rollers uniformly and exactly the same height so the glass hit them all and distributed the weight as evenly as possible, and the template was a good idea for that. I hope this inspires others to put their own improvements and share someday. I would not hesitate to build the next one better using the suggestions of others if it is tried and true.
Build on, my DIY brothers!

wateverLOLAwants Feb 01, 2010 09:50 PM

That's an excellent idea! Very well done!

I have a question and some suggestions to go along with it:

Did you put any sort of insulating-type compound (maybe like Great Stuff or a thinner foam insulation) into the bottom of the track? If not, do you have any issues with heat/humidity escaping out through the gaps under the glass?

Ok, so that was more of a question that included some ideas of insulation solutions, so shoot me hahaha...

Also, You said you were looking for something softer to use as the gliders/wheels in the track, but was thinking you could put foam weather-stripping (the thinnest you can find) or something of that nature onto the bottom of the glass itself. (It's easier to find, as opposed to toy car wheels.)

All in all, I love your idea!

markg Jan 15, 2010 12:15 PM

Inexpensive, simple, functional. I like how the rollers sit down into the divot you drilled. Once again I am impressed.
-----
Mark

terrylove Feb 06, 2010 10:57 PM

I love it! Like you said, it will be put in the mental file folder for later use I'm sure.

Terry

Site Tools